Orientation
Editor Layout
The editor is a single window built from dockable panels around a central Scene viewport. Double-clicking assets opens additional full-size asset editor tabs (material graphs, widget designer, particle graphs …) alongside the Scene tab.
| Panel | Purpose |
|---|---|
| Scene | The 3D viewport — camera navigation, gizmos, play mode, landscape sculpting. Has its own inline toolbar. |
| World Outliner | Hierarchy tree of every entity in the active scene; create, rename, reparent, delete, save as prefab. |
| Details | All components and properties of the selected entity, plus the Add Component menu. |
| Content Browser | Every asset in the project — create, import, organise and open assets in their editors. |
| Quick Settings | Pinned engine settings; switches into the terrain tool while the viewport is in Landscape mode. |
| Environment (View menu) | Add or remove the scene's Sky and Weather entities. |
| Performance Profiler (View menu) | Live FPS/CPU/GPU HUD, benchmark captures, per-pass frame analysis. |
| Play Session Report | Summary shown after a play-in-editor session ends. |
The footer bar holds Undo/Redo buttons on the left, the status
text in the centre, and the current resolution and FPS on the
right. Log output is written to HorizonEngine.log
next to the executable (truncated each launch).
Starting point
Project Hub
The editor launches into the Project Hub: a list of known projects plus a New Project form. Creating a project asks for a template, a scripting language, a name and a directory.
Templates
| Template | What it seeds |
|---|---|
| Empty Project | Only the basic folder skeleton
(Content/, Config/,
Shaders/) — no extra content. |
| Game | Scripts, Audio, Scenes, Models, Textures, Materials, Prefabs and UI folders, plus a startup scene that already contains a Sky and Weather entity. |
| Simulation | Data and Materials folders; startup scene with Sky and Weather. |
| Tool | Source and UI folders; a bare world with no Sky — ideal for utilities and non-game apps. |
Scripting language
The language is a whole-project choice, fixed at creation. It gates which gameplay-logic assets the Content Browser offers and which components appear:
| Language | What you write |
|---|---|
| HorizonCode | Visual node graphs; compiles to native C++ on export. Unlocks HorizonCode Class and Player Controller / Player Character assets. |
| Lua | Lightweight text scripting (the default script backend). Unlocks Script assets and the Script component. |
| Python | CPython scripting — needs a Python install on dev machines. Same Script workflow as Lua. |
| C++ | A native GameLogic library built with your own
toolchain. Scaffolds a compilable
Source/ tree (game runtime, GameInstance,
a per-scene level script and a
CMakeLists.txt). Hidden from the picker
when no CMake/compiler is found on the machine. |
Note: widgets, the Level Script and the Game Instance are always authored in HorizonCode, regardless of the project language — the language choice governs entity scripting and gameplay classes.
Where you live
Scene Viewport
The Scene panel renders the world through the editor camera and carries an inline toolbar: a mode selector (View / Landscape), the gizmo buttons Move / Rotate / Scale, a gizmo-space combo (Local / World), a Screen ring toggle for the rotate gizmo, and the centred Play / Stop button.
Camera navigation
| Input | Action |
|---|---|
RMB hold |
Fly-look — steer with W A S D,
E/Q up/down,
Shift = fast |
Alt + LMB | Orbit around the pivot |
MMB drag | Pan |
| Mouse wheel | Zoom (works on hover, no button needed) |
F | Frame the selected entity |
Gizmos
W / E / R switch between
translate, rotate and scale (mirrored by the toolbar buttons).
The space combo toggles manipulation in local or world axes;
Screen ring adds the view-axis outer ring to the rotate
gizmo. Gizmos are suppressed while flying, while
Alt is held, and in Landscape mode. Every edit is
undoable (Ctrl/Cmd+Z).
Static-mesh assets can be dragged from the Content Browser into the viewport to spawn an entity at the drop point.
Hierarchy
World Outliner
The Outliner shows the entity hierarchy of the active scene.
Drag an entity onto another to reparent it.
Right-click the background for Create Entity;
right-click an entity for
Create Child Entity, Rename,
Save as Prefab and Delete.
The special Sky and Weather entities (added through the Environment window) appear here like any other entity — select them to edit the full sky and weather settings in the Details panel. The Sun and Moon are children of the Sky entity and are driven automatically.
Properties
Details Panel
The Details panel lists every component on the selected entity with full property editors, and ends with the Add Component button. Components you can add directly: Transform, Transform 2D, Mesh, Skeletal Mesh, Nav Mesh, Nav Agent, Material, Camera, Light, Rigid Body, Collider, Script (Lua/Python projects), Audio Source, Audio Listener, Particle System, LOD and Foliage.
Additional components appear with full editors when an entity carries them through other workflows — the Animator family (Animator, Animator Blend, Animator State Machine, Property Animator), Character Controller, Terrain, the in-world UI components, and the Environment/Weather editors on the Sky and Weather entities.
The complete component reference — every property of every component — lives on Scenes & Entities.
Assets
Content Browser
A folder tree on the left, an asset grid on the right. There are up to three roots:
- Content — your project's assets.
- Engine — built-in default assets (read-only).
- Source — the C++ class tree (C++ projects only).
Creating assets
Right-click the background (or an item's Create Asset submenu) to create an asset; a naming popup follows immediately. Always available:
| Asset | Opens in |
|---|---|
| Scene | Scene viewport (.hescene) |
| Material · Material Function | Material graph editor |
| Particle System | Particle graph editor |
| Animator State Machine | State machine editor |
| UI Widget | Widget Designer + Graph |
| Input Action · Input Mapping Context | Input asset editor |
| Texture · Static Mesh · Skeletal Mesh · Shader · Audio · Font | Type-specific inspectors |
Gameplay-logic assets depend on the project language:
HorizonCode Class plus
Player Controller / Player Character
(HorizonCode projects), Script (Lua/Python
projects), or C++ Class (C++ projects — writes a
.h/.cpp pair under
Source/).
Importing
Assets ▸ Import Asset… (or a folder's
Import context item) dispatches by extension to the
mesh, texture, audio, material and font importers. Audio import
currently accepts WAV.
Deep dives
Asset Editor Tabs
Double-clicking an asset opens a dedicated editor tab next to the Scene tab. Material graphs, HorizonCode graphs, the Level Script, the Game Instance, particle graphs and animator state machines all share one node-graph canvas — learn it once (pan with the right mouse button, box-select with the left, zoom with the wheel) and every graph editor works the same way.
| Tab | What it does |
|---|---|
| Material graph | Node-based shader authoring with live preview — the graph is the shader. Materials → |
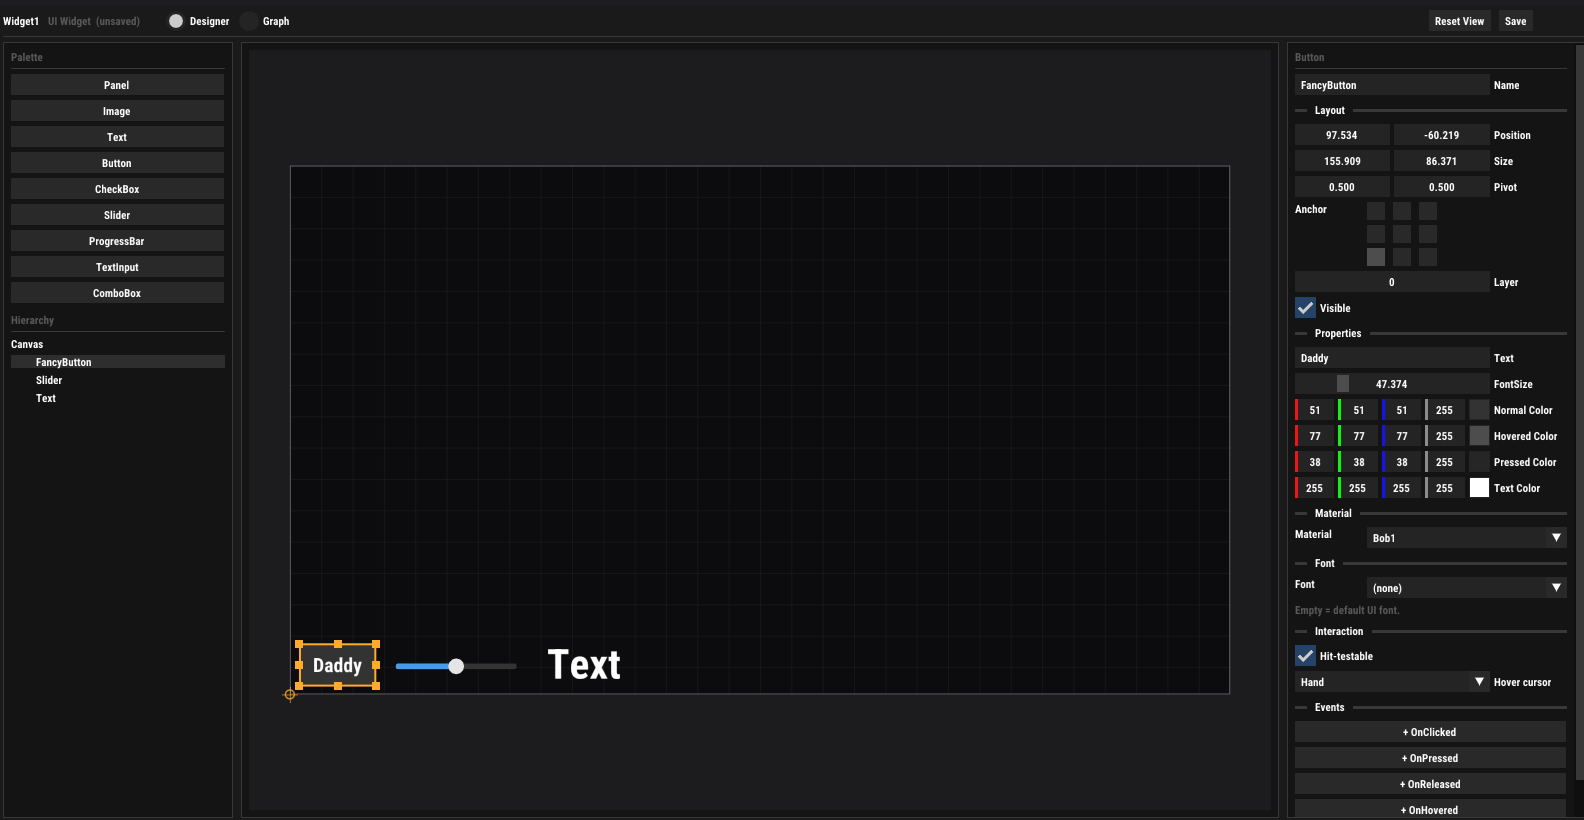
| UI Widget designer | UMG-style Designer (palette, WYSIWYG canvas, hierarchy, per-element details) plus a Graph mode for the widget's logic. UI → |
| HorizonCode Class | Event graph, variables and functions of a reusable visual-scripting class. HorizonCode → |
| Level Script (View menu) | The current scene's graph — reacts to
OnLevelLoaded /
OnLevelUnloaded; saved inside the
scene. |
| Game Instance (View menu) | The app-wide graph that outlives scene changes —
OnInit, OnShutdown,
OnWindowFocusChanged. |
| Skeletal Mesh editor | Joint hierarchy tree, orbit-camera preview, Show Skeleton bone overlay, and an optional animation-clip scrubber. |
| Animator State Machine | States as nodes, transitions as links — parameters, thresholds and crossfade durations. Animation → |
| Particle graph | Emitter node graph with a live simulated preview. Particles → |
| Input assets | Input Action (Button/Axis) and Input Mapping Context (key and axis bindings). |
| Script editor | Syntax-highlighted Lua/Python editing in-editor. |
| C++ Class editor | A .h/.cpp pair as one tab
with a header/source toggle (C++ projects). |
Terrain
Landscape Mode
Switch the viewport toolbar's mode selector to Landscape and the Quick Settings panel becomes the terrain tool.
Create Landscape
With no terrain in the scene the panel shows a creation form: Width (X), Depth (Z), Resolution (2–512), Height Scale, and procedural noise — Seed (0 = flat), Octaves, Frequency, Lacunarity, Gain — with a live grid preview. Creating adds a Terrain entity with a default terrain material. The seed noise is baked once into editable heights; from then on the terrain is a plain heightfield your brushes edit directly.
Sculpting
Six brush tools: Raise, Lower, Smooth, Flatten, Ramp, Roughen, with Radius (0.5–500 m), Falloff and Strength. Drag with the left mouse button in the viewport to sculpt — Flatten pulls toward the height under the drag-start point, Ramp blends between two dragged points. Reset Sculpting clears all edits. Strokes only regenerate the terrain chunks they touch, so sculpting stays fast on large terrains.
Terrain renders as a grid of chunk entities with automatic LOD meshes and skirt geometry — details under Rendering ▸ Performance. Scatter vegetation with the Foliage component.
Sky & weather
Environment Window
View ▸ Environment manages the two special scene
entities:
- Sky — Add Sky / Remove Sky. The Sky entity carries the Environment component (atmosphere, day-night cycle, clouds, stars, fog …) and owns the Sun and Moon as child entities. Removing it leaves a flat background colour.
- Weather — Add Weather / Remove Weather. Requires a Sky to drive; carries the Weather component (presets, precipitation, auto-cycle).
The window only adds, removes and selects — the actual settings are edited in the Details panel. The full parameter reference is on Rendering & Environment.
Test it
Play Mode
The Play button in the Scene toolbar starts a
play-in-editor session; Escape (or the Stop
button) ends it. Entering play initialises physics, fires
Play on Start audio, starts scripts and spawns
HorizonCode player classes. While playing, physics steps at a
fixed timestep, scripts receive onUpdate, collision
events dispatch, widgets tick, and input actions fire.
The scene renders through the camera marked Main Camera (or the first camera found). On stop, the world is restored to its pre-play state and a Play Session Report window summarises the session. Animation, navigation and particle systems also run outside play mode so you can preview them while editing.
Tip: Lua/Python scripts hot-reload during play — save the file and the new code is patched into live instances with their state preserved.
Measure
Performance Profiler
View ▸ Performance Profiler opens the engine's
built-in profiler. Three tabs:
| Tab | Shows |
|---|---|
| Overview | Always-live HUD: FPS, CPU ms, GPU ms and a frame-time graph. |
| Capture | Benchmark capture — start/stop with F9
anywhere (editor or exported game); dumps a
profile_<timestamp>.json into the
dumps/ folder. Plus single-frame
captures. |
| Frame Detail | Per-pass GPU timing (Shadow, SSAO, Scene, Bloom, Tonemap …), a nested CPU scope tree, and counters — draw calls, triangles, visible/total objects, VRAM used vs budget. |
Setup
Preferences
Edit ▸ Preferences (Ctrl/Cmd + ,)
holds machine-level settings:
- Renderer — graphics backend picker (OpenGL everywhere; Metal on macOS; Direct3D 11/12 on Windows; Vulkan where enabled), VSync, GPU weather particles.
- Post-processing — Bloom (threshold, intensity) and ambient occlusion (method SSAO / HBAO / GTAO, radius, intensity). See Post-Processing.
- C++ Toolchain — the status of CMake and a C++ compiler on this machine, with a Recheck button. A "C++ Toolchain Not Found" dialog also appears at startup when they're missing, offering automatic installation — the toolchain is needed for C++ projects and for compiling HorizonCode at export.
Muscle memory
Shortcut Reference
| Shortcut | Action |
|---|---|
W / E / R |
Gizmo: translate / rotate / scale |
F | Frame selected entity |
Ctrl/Cmd + N · Ctrl/Cmd + O |
New / open project |
Ctrl/Cmd + S · Ctrl/Cmd + Shift + S |
Save scene / save scene as |
Ctrl/Cmd + Z · Ctrl + Y / Shift + Ctrl/Cmd + Z |
Undo / redo |
Ctrl/Cmd + , | Preferences |
F9 | Start / stop a profiler benchmark capture |
F11 | Toggle fullscreen |
Escape | Exit play mode; close popups |
In play mode the default fly camera uses
W A S D, E/Space up,
Q/Ctrl down and Shift for
3× speed.